The processes of scanning in (adding stock) and scanning out (removing stock) are fundamental to maintaining an accurate and up-to-date inventory. For the overwhelming majority of small inventory-centered businesses, this could be about everything they expect and need their inventory software to do. Let’s zoom in on how inventory management software like HandiFox Online does scanning in/scanning out, what makes the process error-resistant, and what, if anything, is expected of the user hardware-wise.

Barcoding as the key component of a fail-proof scan-in/scan-out
To begin with, it makes little to no sense to be using an inventory app without getting all of your products barcoded. To quickly check inventory in or out, you need your items and their variants to have their unique barcodes. To read and record these barcodes, you have to get a dedicated barcode scanner or use a barcode scanner app on your phone that scans through your phone’s camera.
Enable barcode scanning
HandiFox Online offers mobile scanning and works great with a wide range of scanners. Mobile scanning is a little slower but more cost-effective for businesses on a small budget. To make a well-informed decision about barcode scanner models or resolve the “barcode scanner vs. mobile scanning” dilemma, use our free Best Barcode Scanners guide.
Generate or record barcodes
Once you’ve paired a scanner with your device, you need to assign barcodes to your inventory. In HandiFox Online, you can record existing barcodes, generate new ones (1D or 2D), and print labels for all of them. You can read more on how to get your business barcoded in this article.
Now that you know what kind of prep work you need to do, let’s talk about scan in/scan out.
Adding inventory
Scanning in is typically done when receiving new stock from suppliers. By scanning products in as they arrive, you update your inventory to reflect the newly added items. Item Receipt is your go-to transaction in HandiFox Online when it comes to scanning in.
To check inventory in, you need to either receive products against an existing purchase order (PO) or generate a brand-new Item Receipt (if the products you’re receiving aren’t linked to any of your open POs).
If you’re receiving against an existing PO (or several of them), this is what the process looks like in the web part of HandiFox Online: go to Purchases -> Purchase Transactions, click on the PO’s number, then click Receive. The system will generate a new Item Receipt with the items from the linked PO.
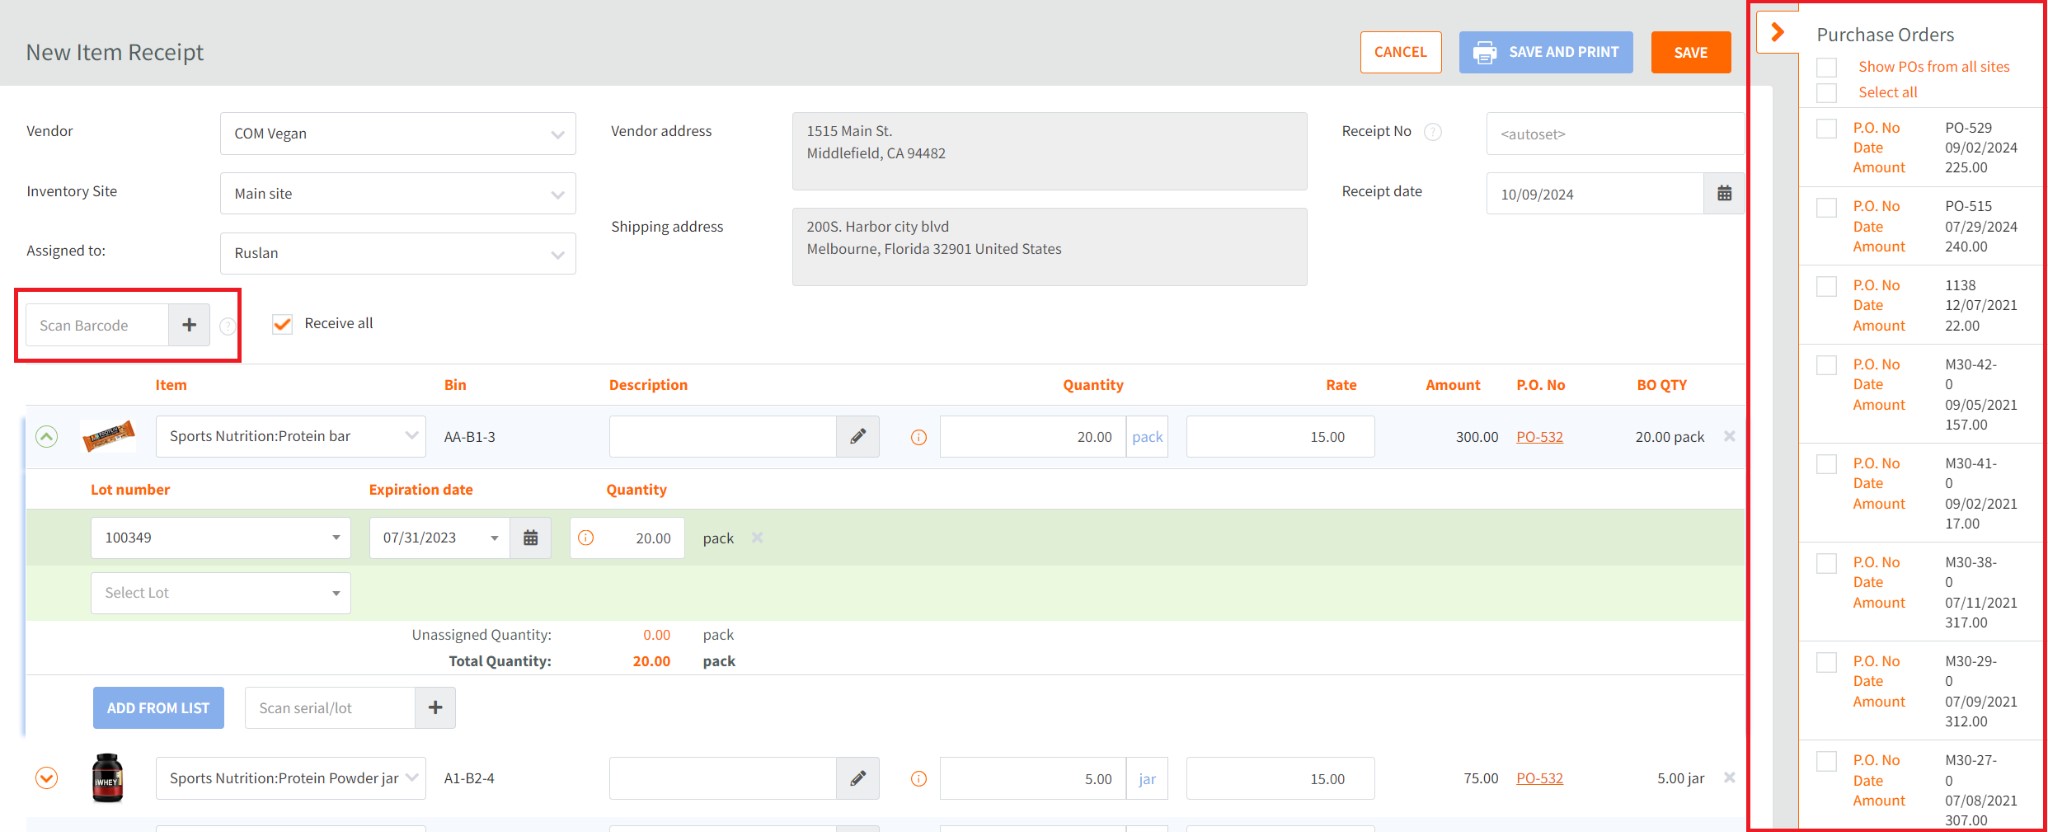
On the right, there’s a list of POs that you can add to this inventory receipt for batch-receiving. Start by scanning the products’ barcodes. Every lot- or serial-numbered product, including its variants with different units of measure, has a unique barcode, so there’s minimal possibility that you miss something. Once the item receipt is saved, this inventory is added to your inventory on hand.
Next to the barcode scanning field is the Receive all checkbox. This is a shortcut that eliminates scanning altogether. It can be used for speed but not for accuracy.
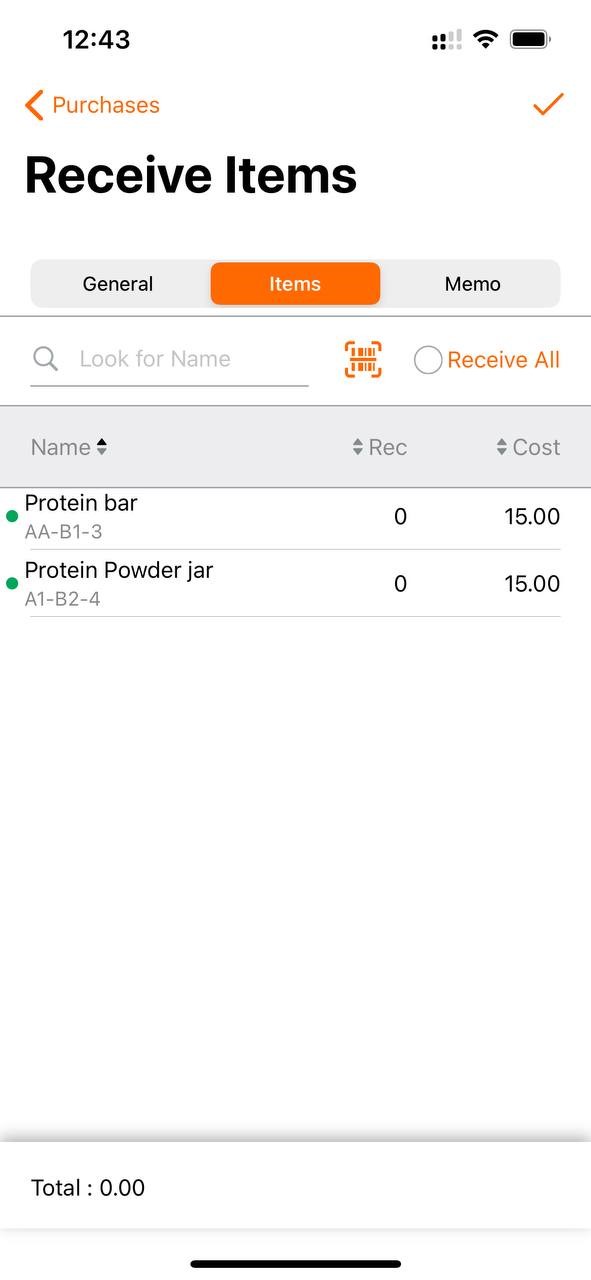
In the mobile app, the workflow is pretty much the same except batch-receiving - it’s not available in the mobile app.
Subtracting inventory
HandiFox Online offers a fail-safe way to subtract inventory from your stock by scanning it out via Invoice or Sales Receipt.
You can generate invoices and sales receipts from scratch by going to Sales->Sales Transactions-> + (Invoice or Sales Receipt). Alternatively, an invoice is automatically generated by the HandiFox software as the result of a picked/packed Sales Order. If you’re starting from scratch, you’ll have to populate an invoice with items by scanning in their barcodes.
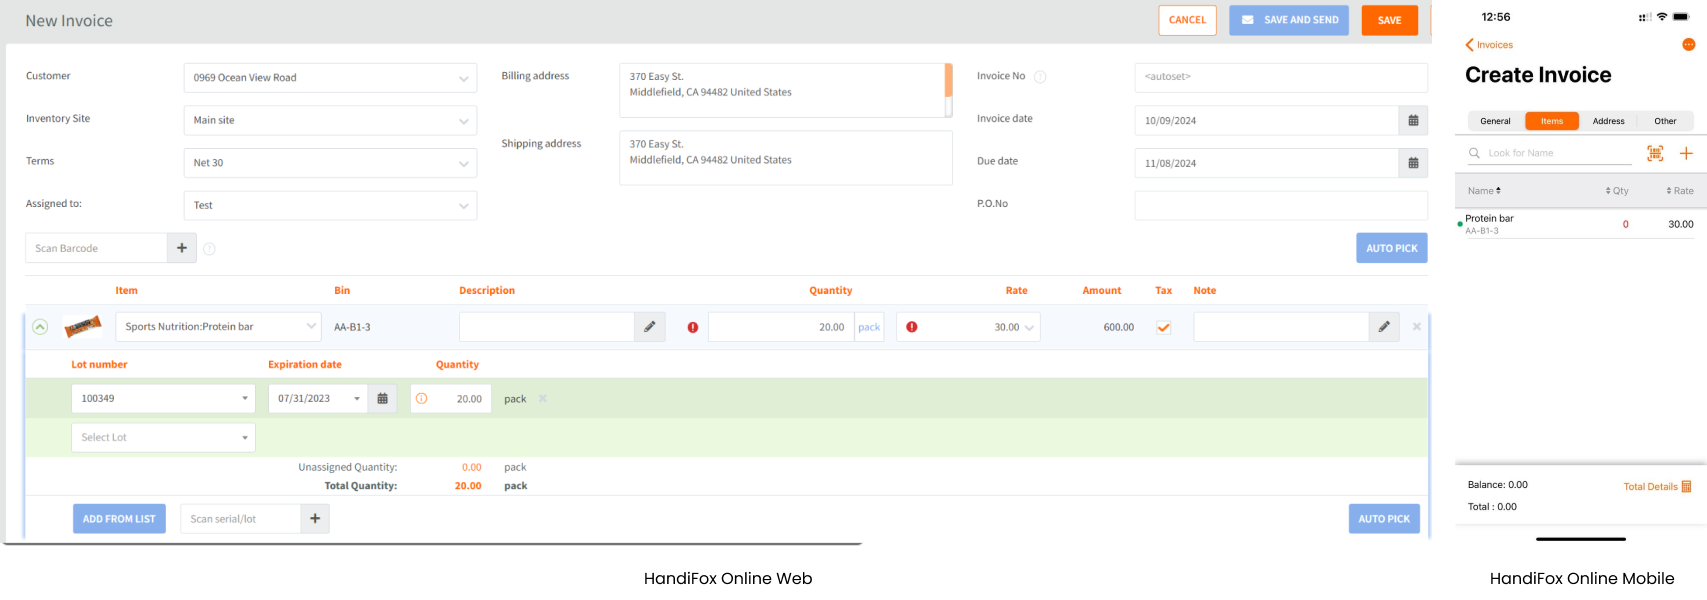
If the second scenario (the one with an automatically generated invoice) is what you’d prefer, this invoice will already have been populated with the items you’re selling.
Sales receipts aren’t generated automatically and have to be created by the user.
To recap, item receipts, invoices, and sales receipts are the most reliable workflows for adding or subtracting inventory that ensure complete transparency and traceability.
Inventory adjustments and counting sessions
In HandiFox Online, there are two more ways to change an item’s quantity: Counting Sessions and Inventory Adjustments. Inventory counts incorporate barcode scanning whereas inventory adjustments don’t. Strictly speaking, neither one is about scanning products in or out.
Counting sessions are designed to find inconsistencies in numbers by meticulously going through all or some parts of the stock on hand. To initiate a counting session, go to Inventory->Counting Sessions-> + .

Scan the barcodes of the products you set aside for auditing or toggle on the Full Inventory Count to count the entire stock.
You can perform cycle counts and physical inventory with the same efficiency using your phone.
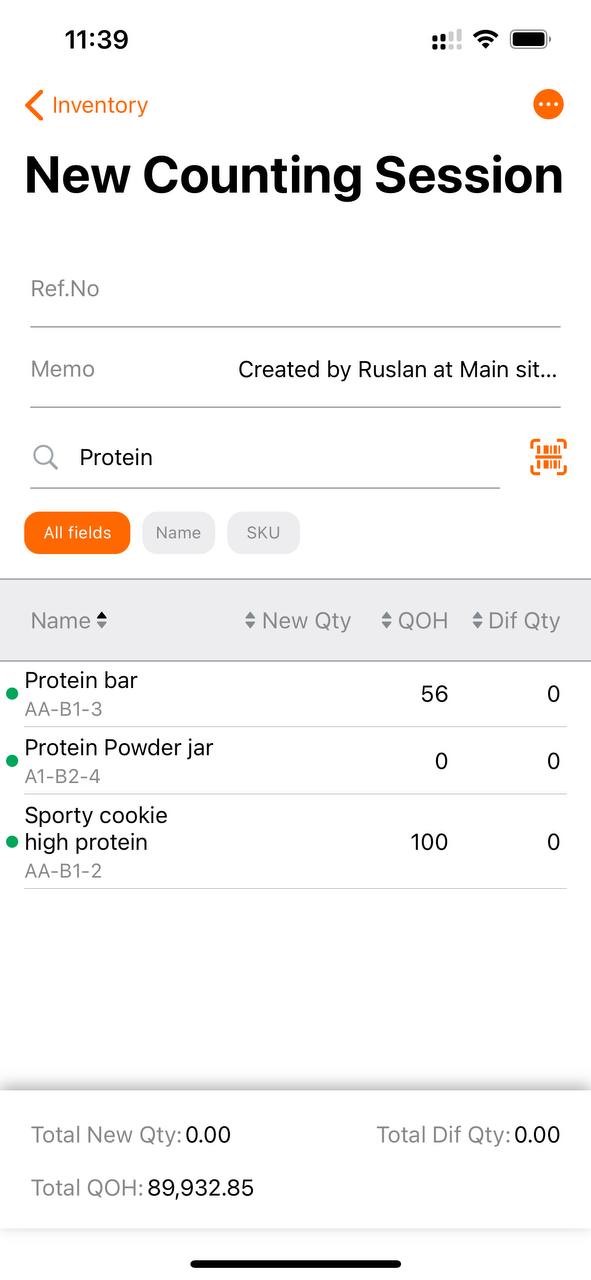
To take effect, counting sessions have to be approved by the Manager. Only after a manager’s approval do inventory levels change. Managers can check what sessions need approval in the Dashboard -> Unapproved counting sessions.
Inventory adjustments provide a quick yet manual way to change the quantity on hand here and now. With inventory adjustments, there’s no verification through barcode scanning and no way of knowing what happened to said inventory unless there isa note from the user who made the change. Just like counting sessions, inventory adjustments do not take immediate effect and need to be approved by the Manager.
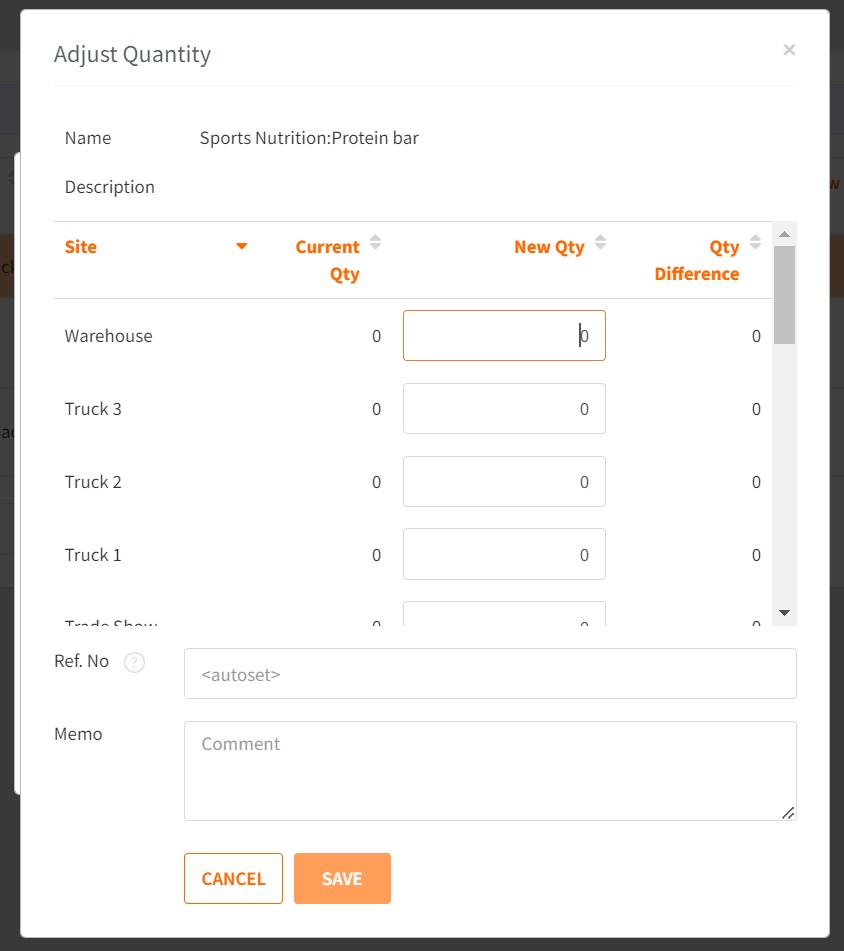
To quickly adjust inventory levels, go to Inventory-> QOH Viewer, pick the item you want to change the quantity for, click on it, and then click Adjust quantity.
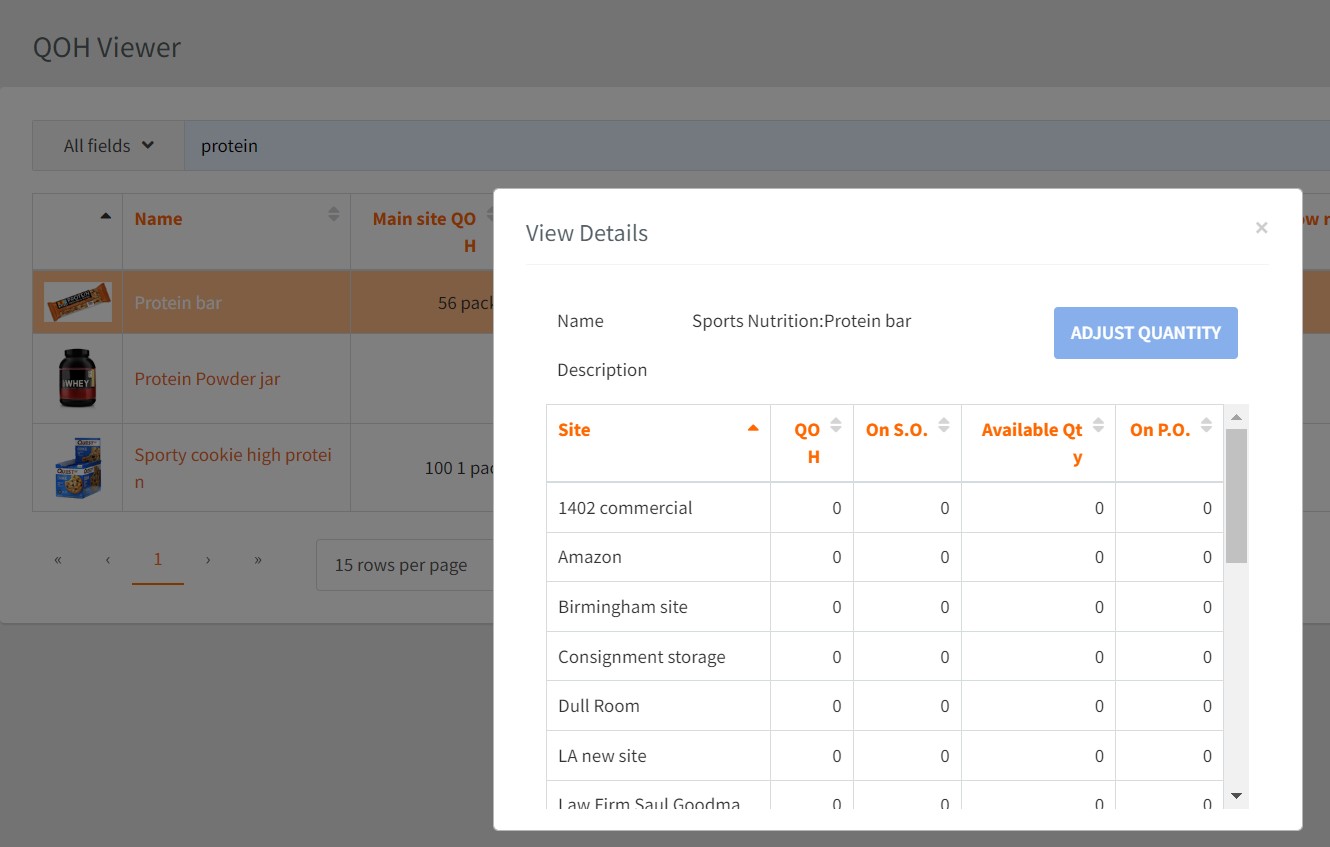
Next, enterthe new quantity, fill out the cause of adjustment in the Memo field, and save the changes.
Key takeaways:
● You need to get your inventory barcode system ready: get all items barcoded, connect a barcode scanner, or enable mobile barcode scanning.
● In HandiFox Online, there are two surefire ways to scan your inventory in and out with maximum accuracy -Inventory Receipt (for adding stock) and Invoice/Sales Receipt (for removing stock).
● You can change current inventory levels via counting sessions or inventory adjustments. The latter doesn’t include barcode scanning, so you have to verify things manually.


.svg)


